










Quick Answer
Wafer check valve installation comes down to four things: flow direction arrow, gasket material, valve position wafer check valve between flanges, and crisscross bolt tightening. Get those four right and the valve prevents backflow automatically with no actuator or manual operation required. YKY Valve manufactures check valves to API 594 and GB/T 12236 standards for 100+ global OEM clients across water treatment, oil and gas, and chemical industries, with 100% pressure testing before shipment and service across 30+ countries.
What Do You Need to Know Before You Start?
Three checks before touching anything.
Flow direction
Arrow on the valve body. That arrow must point the same direction as fluid flow in the pipeline. Not close. Exact. Installing against the arrow and the disc will never open properly. Most common mistake. Easiest to catch before installation, expensive to fix after.
Valve type and orientation
Not every wafer check valve works in every orientation. All types suit horizontal pipelines. Wafer check valve vertical installation with upward flow is only acceptable for double-flap designs or valves specifically marked for vertical service. Single-flap designs. Horizontal only. No exceptions. Vertical downward flow. No wafer check valve handles that reliably.
Straight pipe run
Five pipe diameters minimum, upstream and downstream. Nothing in that zone. No elbows, no reducers. Pump outlets need six pipe diameters minimum before the valve.
How Do You Install a Wafer Check Valve Step by Step?
This is the how to install wafer check valve sequence. Follow it in order.
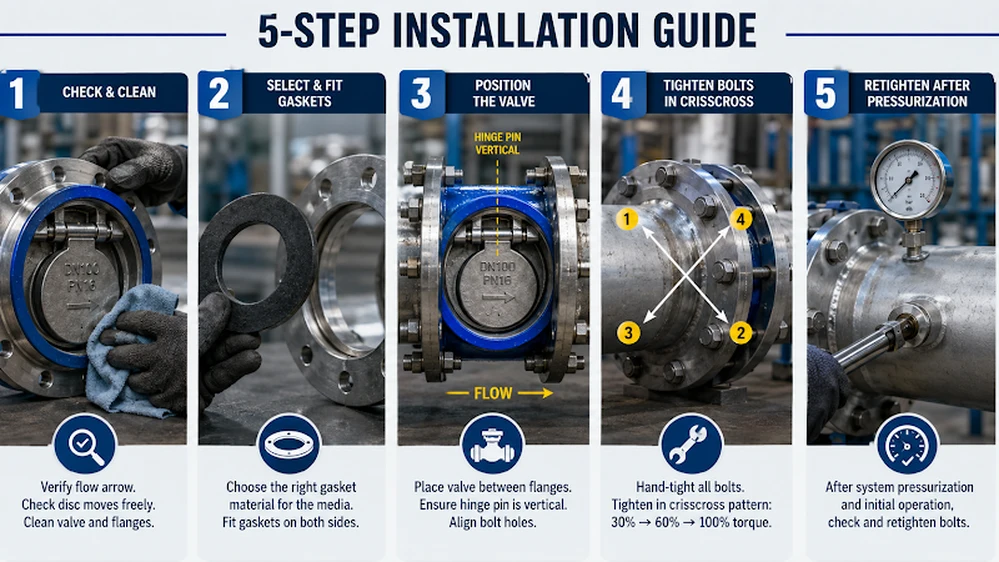
Step 1: Check the valve before anything else.
Arrow confirmed. Then push the disc by hand in both directions. Should move freely. No grinding. No sticking. No debris on the sealing faces. Clean the valve face and pipeline flanges. Do not skip this.
Step 2: Select and fit the gaskets.
Match gasket material to the media. EPDM for water. NBR for oil. Viton for high temperature. PTFE for aggressive chemicals. Wrong gasket material fails fast under operating conditions regardless of how well everything else is installed.
Step 3: Position the valve.
Slide the valve wafer check valve between flanges. Align bolt holes. On horizontal pipelines, the hinge pin must sit vertically. If the hinge pin is horizontal, the disc cannot swing freely. It will jam. That single orientation mistake causes disc sticking that looks like a valve defect but is purely an installation error.
Step 4: Tighten bolts in crisscross pattern.
Bolts through both flanges. Washers both sides. Start hand-tight on all bolts before torquing any of them. Then three passes: 30% torque, 60% torque, full specified torque. Always crisscross diagonal. Never sequentially around the flange. Sequential tightening deforms the gasket and creates leak paths that appear after pressurization.
Step 5: Retighten after first pressurization.
System pressurized and running. Go back and check bolt torque again. Gasket settling and thermal expansion reduce preload after the first cycle. Retighten now. Skipping this step is why slow leaks develop in the first week of operation.
What Is the Difference Between Horizontal and Vertical Installation?
Wafer check valve vertical installation is not the same as horizontal. Different conditions. Different risks.
Horizontal: standard. Hinge pin vertical. Disc swings open under forward flow, drops closed under gravity when flow stops. Predictable. Reliable. Works across most service conditions without special valve features.
Vertical upward flow: double-flap designs only, or valves marked for this service. Spring-assisted closure. Without the spring, the disc relies on reverse pressure to close. Slow closure. Water hammer risk.
Vertical downward flow: not acceptable. Gravity holds the disc open. Reverse pressure cannot overcome it reliably. The valve will not close. Do not attempt this orientation regardless of the valve design.
What Are the Most Common Installation Mistakes?
These come up repeatedly in the field. All avoidable.
Wrong flow direction. Check the arrow before the first bolt goes in. Not after. Reversing a fully installed valve under flanges costs time that checking the arrow first never does.
Single-flap valve in a vertical pipeline. Poor sealing from day one. Always confirm valve type before installation, not after the system is pressurized and leaking.
Turbulence too close to the valve. Elbows and reducers within the minimum straight run distance cause disc flutter. Flutter accelerates seat wear. Premature failure follows. Keep the straight run.
Sequential bolt tightening. Tighten around the flange clockwise and the gasket deforms asymmetrically. Leak path forms on the undertightened side. Always crisscross.
Direct series connection with butterfly valves. No isolation section between them creates pressure spikes that damage both valves. Always include an isolation section.
How Do You Test After Installation?
Two tests. Both required before full operation.
Hydrostatic test.
Fill the system. Pressurize to rated test pressure. Check every flange face. No drips. No wet surfaces. Hold pressure for the full duration required by the applicable standard. Any seepage means gasket or bolt adjustment before proceeding.
Functional test.
Induce forward flow. Confirm the disc opens smoothly and cleanly. Stop the flow. Confirm the disc closes without water hammer or loud slam. A slam means the valve is undersized for the flow velocity. Not an installation problem. A selection problem. Address it before the system goes into continuous operation.
For help selecting the right check valve type, YKY’s check valve range covers API and GB swing check designs with full specification guidance. For broader selection criteria across check valve types, the industrial check valve selection guide covers pressure class, media compatibility, and orientation requirements.
Why Choose YKY Valve for Check Valve Supply?
API 594 and GB/T 12236 certified. WCB, CF8M, LCB body materials. Metal-to-metal and elastomeric seat options. PN16 to PN64. 1″ to 24″ size range. 100% pressure-tested. Factory-direct. No strict MOQ. Single-piece samples available.
For wafer check valve installation support or a factory-direct check valve quotation, contact YKY Valve for engineering consultation and specification assistance.
Engineered for high-pressure pipelines, this API swing check valve features a durable swing disc and metal-to-metal seal—ideal for oil refineries, power plants, and steam systems.
Explore Product
Frequently Asked Questions
What is the correct flow direction for a wafer check valve?
The arrow on the valve body must point in the same direction as pipeline flow. Forward flow opens the disc. Reverse flow closes it. Installing against the arrow prevents the valve from opening correctly during operation.
Can a wafer check valve be installed vertically?
Double-flap designs and valves marked for vertical service can be installed with upward flow. Single-flap types must be installed horizontally only. Vertical downward flow is not acceptable for any standard wafer check valve design.
What gasket material should I use?
EPDM for water, NBR for oil, Viton for high temperature, PTFE for chemical resistance. Match gasket material to the actual fluid type and operating conditions. Wrong material fails regardless of how well the rest of the installation is done.
Why tighten bolts in a crisscross pattern?
Crisscross tightening spreads load evenly across the gasket. Sequential tightening around the flange deforms the gasket unevenly, creating low-pressure zones where leaks develop after the system is pressurized and in service.